Valentines Treats Mini Cheesecakes
Highlighted under: Baking Moments
I love making these Valentine’s Treats Mini Cheesecakes for friends and family. Each mini cheesecake captures the essence of love, with creamy textures and rich flavors, all packed into cute little servings. They are perfect for sharing on special occasions or simply indulging in a sweet moment. With a buttery crust and a luscious filling, we find that they never fail to impress with their adorable presentation and delightful taste. Plus, they can be made ahead of time, making them an ideal treat for any celebration!
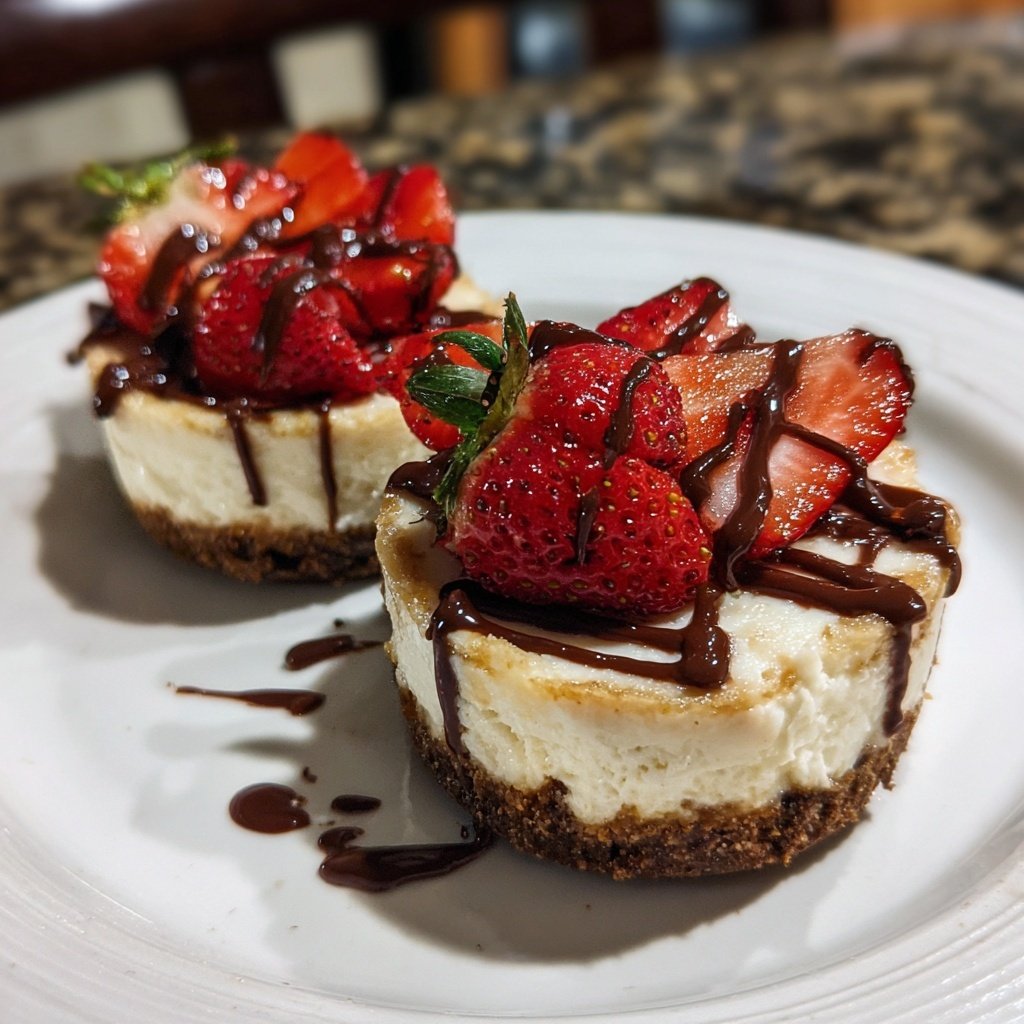

When I first decided to make these mini cheesecakes, I was amazed by how simple yet effective they are in bringing smiles to people's faces. I experimented with adding a hint of vanilla and some fresh berries on top. The combination elevates the flavor profile and creates a beautiful presentation. Every bite is a little celebration!
The crust uses crushed graham crackers mixed with melted butter, which gives it a perfect crunchy texture that complements the smooth filling. I recommend letting them cool in the fridge for a few hours to achieve that perfect creaminess you’ll love!
Why You Will Love This Recipe
- Decadent flavors balanced with a hint of fruitiness
- Adorable mini size perfect for sharing
- No-bake option available for easy preparation
Perfecting the Crust
The crust is the foundation of these mini cheesecakes, so it’s important to get it just right. Combining the graham cracker crumbs with melted butter and sugar creates a rich, buttery flavor that complements the creamy filling. Make sure to press the mixture firmly into each muffin cup to form a solid base. This helps prevent the crust from crumbling when you remove the cheesecakes later. If you prefer a slightly different flavor, consider substituting the graham crackers with crushed Oreos or vanilla wafers.
Baking the crust for just 5-7 minutes gives it a light golden color, which enhances the flavor and adds a slight crunch. Overbaking can lead to a dry crust, so keep a close eye on it. Once out of the oven, let them cool completely before adding the filling to ensure a perfect texture. I recommend pausing to let the crust cool for at least 10 minutes, as it will become easier to remove from the muffin tins without breaking.
Crafting the Creamy Filling
The key to a successful cheesecake filling is the right texture and sweetness. Make sure your cream cheese is softened properly; this will ensure a smooth, lump-free filling. Beat it with powdered sugar and vanilla until glossy and well blended. If you're looking for a lighter texture, folding in whipped cream gently is crucial; it adds airiness without deflating the filling. Be cautious not to overmix after adding the whipped cream, as this can lead to a dense combination instead of the desired fluffy consistency.
For those seeking a unique twist, feel free to incorporate flavored extracts or zest, such as lemon or almond, to intensify the filling. A pinch of salt can also enhance the overall flavor profile, balancing out the sweetness just perfectly. If you're allergic to dairy, a cream cheese alternative can be used, but ensure it has a similar consistency for the best results.
Serving and Storing Your Cheesecakes
Once your mini cheesecakes have set in the refrigerator for at least 2 hours, they are ready for serving! Carefully run a knife around the edge of each cheesecake to help them release more easily from the muffin tins. I recommend using silicone muffin cups for even easier removal and to prevent sticking. You can store any leftovers in an airtight container in the refrigerator for up to 5 days, making them a convenient treat to enjoy later.
If you want to make these mini cheesecakes ahead of time, you can prepare them a day in advance. Just keep them tightly covered in the refrigerator until you’re ready to serve. Top with fresh fruit or chocolate just before serving for the best appearance and flavor. If you need to freeze them, wrap each cheesecake in plastic wrap and then place them in a freezer-safe container. They can last for up to 3 months; just thaw them in the fridge overnight before serving.
Ingredients
For a delightful experience, make sure to gather all the ingredients before you start:
For the crust
- 1 cup graham cracker crumbs
- 1/4 cup unsalted butter, melted
- 2 tablespoons sugar
For the filling
- 16 oz cream cheese, softened
- 1 cup powdered sugar
- 1 teaspoon vanilla extract
- 1 cup whipped cream
- Fresh fruit or chocolate for topping
Instructions
Here’s how to create these mini cheesecakes in just a few simple steps:
Prepare the crust
In a mixing bowl, combine the graham cracker crumbs, melted butter, and sugar until well mixed. Press about a tablespoon of the mixture into the bottom of each muffin cup. Bake at 350°F (175°C) for 5-7 minutes, then allow to cool.
Make the filling
In a large bowl, beat the softened cream cheese together with the powdered sugar and vanilla extract until smooth. Gently fold in the whipped cream until combined.
Assemble the cheesecakes
Spoon the filling over the cooled crusts in the muffin tins. Smooth the tops with a spatula. Refrigerate for at least 2 hours to set.
Serve
After the cheesecakes have set, carefully remove them from the muffin tins. Top with fresh fruit or chocolate as desired before serving.
Pro Tips
- Allowing the mini cheesecakes to chill overnight will enhance their flavor and texture. You can also experiment with different toppings like crushed candy or caramel drizzle!
Variations to Explore
These mini cheesecakes offer a great base for variations! For a chocolate cheesecake, simply swap out 1/4 cup of the cream cheese with melted chocolate or add cocoa powder to the filling. You can also experiment with flavors like strawberry or raspberry by folding in pureed fruit or using fruit toppings. Each variation brings a new twist to the classic recipe while still maintaining that creamy texture everyone loves.
Consider adding a layer of fruit preserves or chocolate sauce between the crust and the filling for an extra punch of flavor. This not only enhances the taste but also adds a beautiful visual element when cut. Toppings can also be mixed up; instead of just fresh fruit, try crushed nuts, or a drizzle of caramel sauce for a decadent finish.
Troubleshooting Tips
In case your filling does not set properly, ensure that your whipped cream was indeed folded gently and that the cheesecakes spent enough time in the refrigerator. If after the intended chilling time the consistency is still off, you can pop them in the freezer for about 30 minutes, which can help firm them up without compromising too much on flavor.
If you find that your crust crumbled when you removed the mini cheesecakes, it likely wasn't packed tightly enough. For next time, really press the crust mixture down firmly, and consider adding a little more melted butter to help bind it together if you encounter that problem again. Adjusting the baking time may also help if the crust seems too soft.
Questions About Recipes
→ Can I use low-fat cream cheese?
Yes, low-fat cream cheese can be used, but the texture may be slightly different.
→ How long can I store these cheesecakes?
They can be stored in the fridge for up to 5 days in an airtight container.
→ Can I freeze the mini cheesecakes?
Yes, they freeze well for up to 2 months. Just thaw in the fridge before serving.
→ What can I substitute for graham crackers?
You can use digestive biscuits or even Oreo cookies for a chocolatey flavor!
Valentines Treats Mini Cheesecakes
Created by: Adeline Morris
Recipe Type: Baking Moments
Skill Level: Intermediate
Final Quantity: 12 servings
What You'll Need
For the crust
- 1 cup graham cracker crumbs
- 1/4 cup unsalted butter, melted
- 2 tablespoons sugar
For the filling
- 16 oz cream cheese, softened
- 1 cup powdered sugar
- 1 teaspoon vanilla extract
- 1 cup whipped cream
- Fresh fruit or chocolate for topping
How-To Steps
In a mixing bowl, combine the graham cracker crumbs, melted butter, and sugar until well mixed. Press about a tablespoon of the mixture into the bottom of each muffin cup. Bake at 350°F (175°C) for 5-7 minutes, then allow to cool.
In a large bowl, beat the softened cream cheese together with the powdered sugar and vanilla extract until smooth. Gently fold in the whipped cream until combined.
Spoon the filling over the cooled crusts in the muffin tins. Smooth the tops with a spatula. Refrigerate for at least 2 hours to set.
After the cheesecakes have set, carefully remove them from the muffin tins. Top with fresh fruit or chocolate as desired before serving.
Extra Tips
- Allowing the mini cheesecakes to chill overnight will enhance their flavor and texture. You can also experiment with different toppings like crushed candy or caramel drizzle!
Nutritional Breakdown (Per Serving)
- Calories: 220 kcal
- Total Fat: 14g
- Saturated Fat: 8g
- Cholesterol: 60mg
- Sodium: 160mg
- Total Carbohydrates: 23g
- Dietary Fiber: 1g
- Sugars: 15g
- Protein: 3g